How to install python, bitarray, numpy on Ubuntu

The following steps describe how to install python, bitarray extension, and numpy extension, in order to use MZIP library.

To install python:

  1. type in the terminal
    sudo apt-get install build-essential
    sudo apt-get install libreadline-gplv2-dev libncursesw5-dev libssl-dev libsqlite3-dev tk-dev libgdbm-dev libc6-dev libbz2-dev
  2. change directory to Downloads:
    cd ~/Downloads/
  3. get Python archive:
    wget http://python.org/ftp/python/2.7.5/Python-2.7.5.tgz
  4. extract the archive:
    tar -xvf Python-2.7.5.tgz
  5. change directory again:
    cd Python-2.7.5
  6. configure python:
    ./configure
  7. compile and install:
    make
    sudo make altinstall
  8. Now, download the bitarray from here
  9. unzip the archive:
    tar xzf bitarray-0.8.1.tar.gz
  10. change directory:
    cd bitarray-0.8.1
  11. use python to install bitarray:
    python setup.py install
  12. Now, install numpy by typing: sudo apt-get install python-numpy

You should be ready to use the MZIP lib by now.

How to install SDSL-LITE on Ubuntu

Here’s how to install SDSL-LITE library on ubuntu.

First, you need to install git by typing in the terminal sudo apt-get install git-core.

Then, in the terminal:

  1. type the following to clone the git project
    1. git clone https://github.com/simongog/sdsl-lite.git
  2. install latest g++ by typing in the terminal: sudo apt-get install build-essential
  3. Change directory by typing:
    cd sdsl-lite
  4. type to install:
    ./install.sh SDSL_INSTALL_PATH
  5. change directory again:
    cd tutorial
  6. compile all the files by typing
    make

How to install Ubuntu 14.04 on the Oracle VM

Hello again.

For installing Ubuntu on your local machine, one of the ways is to have a virtual machine running the OS. Therefore, the following steps describe the install process:

  1. Download a clean copy of Ubuntu 14.04 from here
  2. Download the VirtualBox from here (VirtualBox 4.3.12 for Windows hosts)
  3. Install the VirtualBox
  4. Before creating the virtual machine, restart, then go to BIOS (by pressing one of the keys right after the PC restarts..for example, on an HP envy F10)
  5. Look for an option related to the “Virtualization Technology”, like in the following image and be sure to set it to “Enabled”
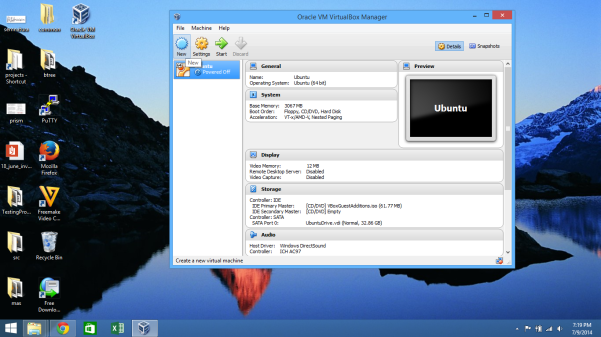
  6. Save, and restart, then when logged in, start the VirtualBox and press the “New” button from top left:VirtualBox
  7. Choose a name for the VM (eg. Ubuntu) and click next
  8. Choose the amount of RAM memory you want Ubuntu to use (1GB, or 1.5GB probably is enough..depends on how much RAM your machine has..so don’t chose more than half of your RAM mem)
  9. Select Create a Virtual Hard Drive Now, and press Create
  10. Choose VDI, the first option
  11. Choose Dynamically allocated, unless you want the VM to have a limit on the space it may use
  12. Choose how much space you want to reserve for the VM (I think 20GB is enough)
  13. At the end..just press Create
  14. Now, press the Settings button, then Storage, and where it says Controller: IDE press on the first small icon with a ‘+’ on it (Add CD/DVD..) and then press “Choose disk”
  15. Select the disk image file that you downloaded from Ubuntu website
  16. When loaded, press Start (the green arrow)

Now, when the Ubuntu is loaded it will ask you for trying it out or installing it like in the following image:

You want to install the system, so choose Install Ubuntu. After the installment process, Ubuntu will ask to reboot (here’s a tricky part), when I clicked reboot, it just crashed, so don’t click reboot yet. Press the X button on the right to close the VM. It will ask you to save it’s state or shut down. Choose Save . The VM will close, but after that click the green arrow again. It will take you to the same place, so now click reboot.

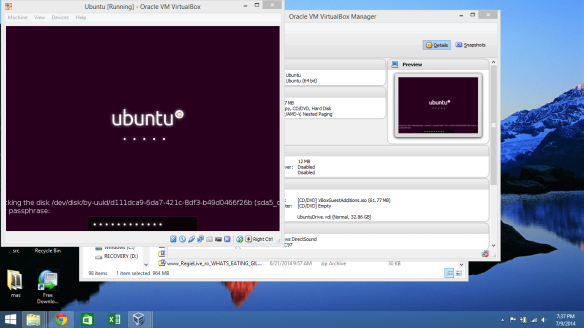
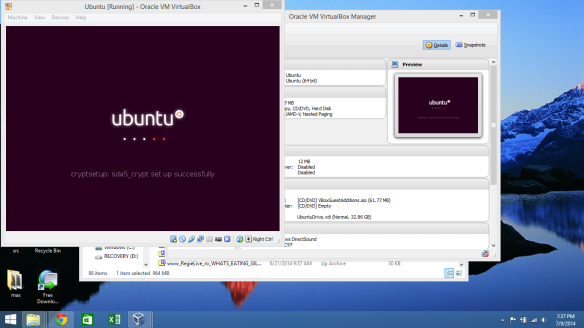
After the reboot and probably after it will ask you for a password (if you chose encrypt the home folder and some other stuff) like this:

Screenshot (32)Screenshot (33)


if you chose to encrypt the home folder..if not, it won’t ask you for this, it will take you straight to the login part.

There’s one more step to do, you will notice that the resolution is very low (640x), so you need to change this.

To do this:

  1. click on the Devices button on the VM window.
  2. click on “Insert Guest Additions CD image”
  3. follow the wizard to install the addition, then restart

Now, you will notice that when you resize the VM window, the resolution changes.


How to install mpir in Visual Studio 2012

Hello again 🙂 I was unable to write any tutorials lately, because of the school..so..I apologize for that. Today I am going to explain how to use the gmp library with visual studio 2013. There is a library called “mpir”, which is built on the gmp lib, and you can actually use it with VS. There is an article where I have inspired from, but the article talks a lot about building the library, which may become very stressful regarding the difference between the VS versions (for example I was unable to build the mpir library with my VS 2013..all kinds of errors). This is the article I mentioned. The solution is to download a pre built library, so click here to download it. Extract the zip, then go to \mpir\dll\Win32\release\ or \mpir\dll\Win32\debug\ (if you will use the debuger in VS). Here you have 3 files that we are interested in: mpir (an Object File Library), mpir (Program Debug Database) and a mpir (header file). We are going to copy the first 2 files mentioned above to C:\Program Files (x86)\Microsoft Visual Studio 12.0\VC\lib\. We are going to copy the header file to C:\Program Files (x86)\Microsoft Visual Studio 12.0\VC\include\. Then, start the Visual Studio and make a new c/c++ console application project. Right click on the Project name on the right side (where all the folders are) and select properties. Then click “configuration properties”, then click “Linker”, and then “Command Line”. After this, in the “Additional options” box type mpir.lib and then click ok. Now you should be set and ready to program so, just try this code that I made:

#include "stdafx.h"
#include 

int _tmain(int argc, _TCHAR* argv[])
{
    mpz_t aNumber;
    mpz_init(the_number);
    mpz_set_str(the_number, "123456789", 10);

    char * tmp = mpz_get_str(NULL, 10, aNumber);
    printf("%s", tmp);

    /*
       I didn't use mpz_out_str(stdout,10,aNumber) because
       there was an error saying that I don't have access to
       write to stdout..and so on, so I thought to put the result
       into a char array and print the array.
    */
}

LEX Programming part I

Here we go again, after a break of 5 months. I’ve been traveling and working in the US for the summer, and now I’m back to school, back to business as some would say. There’s a new course we are studying this year, it is called Formal Languages, Automata, and Compilers. There is a lot of theory about grammarnondeterministic finite automata, deterministic automata, minimal automata, regular expressions, syntactic tree  and so on that you can find here. I’m going to talk about programming, this means I’m going to talk about how to analyze a text using LEX(or FLEX). The LEX file’s extension is .l and is compiled as following: lex name_of_file.l This is generating a .c file called lex.yy.c which you will compile further using the gcc compiler. The lex file is made out of three sections:

  1. The defining section (where you define the identifiers)
  2. The lex “rules” section (where you specify what should do when the scanner finds something that matches the identifiers)
  3. The main() function

Each section but the last ends with a %% simbol. As you may guess in a .l file there is lex code and c code at the same time. The c code goes into main() and in blocks like “{…c code…}”. Below there’s a sample of a code that gives as output the sum of all the numbers divisible by 7. There are few lex attributes we use in our code: the input and output file descriptors for lex: yyout and yyin, the yytext array that stores all the text that matches the given identifiers and the yylex() function that has to be called at the end of the main() function for the lex code to run. Before reading the code, here we have some predefined rules we use in LEX:

  1. [abcd]     means either a or b or c or d
  2. [abcd]+   means either a or b or c or d but repeatedly (eg: aaabbc or abcd or aabbcccdd)
  3. {abcdef} this refers to an identifier called abcdef that you should have declared in the defining section
  4. %s is called a normal state
  5. %x is called an exclusive state (i will explain it in different articles)
  6. for concatenation we just stick the rules like this: [abc][101]+
  7. for alternative we use the | symbol like this: [abc]|[0-9]
  8. [0-9] means any digit from 0 to 9
  9. [^0-9] means any character but 0-9 digits
  10. . followed by any characters will make the scanner ignore the given characters eg: (. |\n ; ignores the space, the vertical bar and the newline)
%{
#include
int sum;
%}
digit [0-9]
number [1-9]{digit}+|{digit}
//here defining area ends
%%
{number} {
			int n;
			n = atoi(yytext);
			if (n%7 == 0) sum += n;
		}
//here the rules area ends
%%
int main(int argc, char* argv[]){

	FILE* fout;

	yyin = fopen(argv[1],"r");

	if (!(fout = fopen("out.txt","w"))){
		perror("ERR:");
	}
	else yyout = fout;

yylex();

printf("Sum of number divisible by 7: %d\n",sum);
return 0;
}

Lex programming – Part I

Here we go again, after a break of 5 months. I’ve been traveling and working in the us for the summer, and now I’m back to school, back to business as some would say.

There’s a new course we are studying this year, it is called Formal Languages, Automata, and Compilers. There is a lot of theory about grammarnondeterministic finite automata, deterministic automata, minimal automata, regular expressions, syntactic tree  and so on that you can find here.

I’m going to talk about programming, this means I’m going to talk about how to analyze a text using LEX(or FLEX).

The LEX file’s extension is .l and is compiled as following:

lex name_of_file.l

This is generating a .c file called lex.yy.c which you will compile further using the gcc compiler.

The lex file is made out of three sections:

  1. The defining section (where you define the identifiers)
  2. The lex “rules” section (where you specify what should do when the scanner finds something that matches the identifiers)
  3. The main() function

Each section but the last ends with a %% simbol.

As you may guess in a .l file there is lex code and c code at the same time. The c code goes into main() and in blocks like “{…c code…}”.

Below there’s a sample of a code that gives as output the sum of all the numbers divisible by 7.

There are few lex attributes we use in our code: the input and output file descriptors for lex: yyout and yyin, the yytext array that stores all the text that matches the given identifiers and the yylex() function that has to be called at the end of the main() function for the lex code to run.

Before reading the code, here we have some predefined rules we use in LEX:

  1. [abcd]     means either a or b or c or d
  2. [abcd]+   means either a or b or c or d but repeatedly (eg: aaabbc or abcd or aabbcccdd)
  3. {abcdef} this refers to an identifier called abcdef that you should have declared in the defining section
  4. %s is called a normal state
  5. %x is called an exclusive state (i will explain it in different articles)
  6. for concatenation we just stick the rules like this: [abc][101]+
  7. for alternative we use the | symbol like this: [abc]|[0-9]
  8. [0-9] means any digit from 0 to 9
  9. [^0-9] means any character but 0-9 digits
  10. . followed by any characters will make the scanner ignore the given characters eg: (. |\n ; ignores the space, the vertical bar and the newline)
%{
#include <stdio.h>
int sum;
%}
digit [0-9]
number [1-9]{digit}+|{digit}
//here defining area ends
%%
{number} {
			int n;
			n = atoi(yytext);
			if (n%7 == 0) sum += n;
		}
//here the rules area ends
%%
int main(int argc, char* argv[]){

	FILE* fout;

	yyin = fopen(argv[1],"r");

	if (!(fout = fopen("out.txt","w"))){
		perror("ERR:");
	}
	else yyout = fout;

yylex();

printf("Sum of number divisible by 7: %d\n",sum);
return 0;
}

C++ code explanation: template polymorphism overloading and vectors

OFF-TOPIC – made some explanation on some code from an exam sample:


//
//  main.cpp
//  code explanation
//
//  Created by Petricioiu Robert on 6/8/13.
//  Copyright (c) 2013 Petricioiu Robert. All rights reserved.
//

#include <iostream>
#include <vector>

using namespace std;

//class parametrization (Universal Polymorphism)
template<class T>
class MyElement{
public:
    MyElement (T arg = 0){
        element = arg;
    }
    T increase() {return ++element;}
private:
    T element;
};

//template class overloading
template<>
class MyElement<char>{
//special implementation for the char type

public:
    MyElement(char arg = 'a'){
//implicit init of the arg attribute with the 'a' value
        element = arg;
    }
    char increase(){
//checks if the value contained by the element is
//a minuscule letter and transforms it in a CAPITAL one then
//returns the transformed value

        if ((element >= 'a') && (element <= 'z')) {
            element += 'A'-'a';
            return element;
        }
    }
private:
    char element;
};

int main(int argc, const char * argv[])
{

    vector<MyElement<int>> a(3); //reserving 3 elements in a vector
//the a vector will contain (0,0,0)
    vector<MyElement<char>> c(4,'i');
//reserving 4 elements with the implicit value 'i'
//the c vector will contain ('i','i','i','i')

    int x[] = {1,3,5,7,9};
    char y[] = "info";

    a.assign(x+1, x+4);
//copies the values hold by x[] from x+1 to x+4 position (3,5,7) into the
//a vector || a[0] = 3, a[1] = 4, a[2] = 7

    c.assign(y, y+4);
//copies the values hold by y[] from y to y+3 position ("info")
//+ the null char

    cout<<a[2].increase()<<endl; //will show (7+1) meaning 8
    cout<<c[1].increase()<<endl; //will show 'n' transformed: 'N'

    return 0;
}

UML Demo

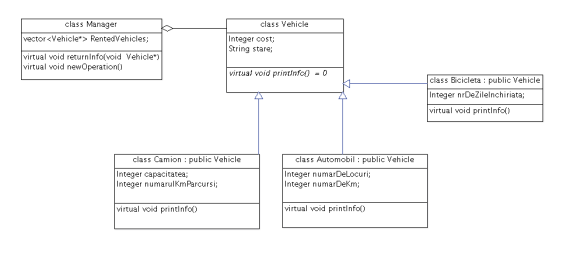
Here’s some UML samples: code and diagrams:

umlTest


//
//  main.cpp
//  testUML
//
//  Created by Petricioiu Robert on 6/8/13.
//  Copyright (c) 2013 Petricioiu Robert. All rights reserved.
//

#include <iostream>
#include <vector>

using namespace std;

class Vehicle{

protected:

bool state;
int cost;

public:
Vehicle(bool newState, int newCost) : state(newState), cost(newCost){}

void setState(bool newState){
state = newState;
}
int getState(){
return state;
}
void setCost(int newCost){
cost = newCost;
}
int getCost(int newCost){
return cost;
}
virtual void printInfo()  = 0;
};
class Autom : public Vehicle{
private:
int numberOfSits;
int numberOfKm;

public:
Autom(bool newState, int newCost, int newNumberOfSits, int newNumberOfKm) : numberOfKm(newNumberOfKm), numberOfSits(newNumberOfSits),
Vehicle(newState,newCost){}

void setNumberOfSits(int newVal){
numberOfSits = newVal;
}
void setNumberOfKm(int newVal){
numberOfKm = newVal;
}
int getNumberOfSits(){
return numberOfSits;
}
int getNumberOfKm(){
return numberOfKm;
}
void printInfo(){
cout<<"Cost: "<<cost<<endl;
if (!state)
cout<<"State: rent"<<endl;
else cout<<"State: undisposed"<<endl;

cout<<"Number locuri: "<<numberOfSits<<endl;
cout<<"Number of km: "<<numberOfKm<<endl;
}
};
class Truck : public Vehicle{
private:
int capacity;
int numberOfKm;

public:
Truck(bool newState, int newCost, int newCapacity, int newNumberOfKm) : capacity(newCapacity), numberOfKm(newNumberOfKm),
Vehicle(newState,newCost){}

void setNumberOfKm(int newVal){
numberOfKm = newVal;
}
int getNumberOfKm(){
return numberOfKm;
}
void setCapacity(int newVal){
capacity = newVal;
}
int getCapacity(){
return capacity;
}
void printInfo(){
cout<<"Cost: "<<cost<<endl;
if (!state)
cout<<"State: rent"<<endl;
else cout<<"State: undisposed"<<endl;

cout<<"Capacity: "<<capacity<<endl;
cout<<"Number of km: "<<numberOfKm<<endl;
}

};
class Bike : public Vehicle{
private:
int numberOfRentDays;

public:
Bike(bool newState, int newCost, int newNumberOfRentDays) : numberOfRentDays(newNumberOfRentDays), Vehicle(newState,newCost){}

void setNumberOfRentDays(int newVal){
numberOfRentDays = newVal;
}
int getNumberOfRentDays(){
return numberOfRentDays;
}
void printInfo(){
cout<<"Cost: "<<cost<<endl;
if (!state)
cout<<"State: rent"<<endl;
else cout<<"State: undisposed"<<endl;

cout<<"NumberOfRentDays: "<<numberOfRentDays<<endl;
}
};
class Manager{
private:
vector<Vehicle* > _vehicles;

public:
Manager(){}

void addVehicle(Vehicle* newVehicle){
_vehicles.push_back(newVehicle);
}
void showVehicleInfo(Vehicle* _vehicle){
_vehicle->printInfo();
}
void showMeTheVehicles(){
for (vector<Vehicle*>::iterator it =_vehicles.begin(); it != _vehicles.end(); ++it) {
(*it)->printInfo();
}
}

};

int main(int argc, const char * argv[])
{

Autom *m = new Autom(true,2500,5,100);
Truck *t = new Truck(false, 25000, 3, 100);
Bike *b = new Bike(true, 500, 120);

Manager _boss;

_boss.addVehicle(m);
_boss.addVehicle(t);
_boss.addVehicle(b);

_boss.showMeTheVehicles();

return 0;
}

Managing the peripherals

The terms I will discuss today are:

  1. Second Memory (the hard-disk)
  2. Managing the swap space
  3. Building a better disk

1. Second memory 

  • Structure
  • Scheduling
  • Managing

The peripherals are divided according to functionality in :

  • I/O peripherals
  • Storing peripherals

according to it’s operating manner in :

  • dedicated (only for one process)
  • shared (one or more processes)

according to it’s transfer manner in :

  • character ( views info as a long byte array, e.g. printer,  keyboard, mouse)
  • block ( hard – disk, transfers de information between main memory and second memory through blocks, small pieces of data)

according to it’s access time variation in :

  • direct accessed (time variation differs a bit)
  • complete direct accessed (time variation is stable)
  • sequential accessed (the time variation differs a lot)

The magnetic disks are viewed as a long unidimensional array of blocks.

Bellow is a drawing of a hard-disk.

Hard disk schematic

The disk speed depends on:

  • seek time
  • rotation latency
  • transfer time

( ! ) the disk total access time is the sum of the above.

Issues regarding the hard-disk speed:

  • Scheduling the access to disk
  • Writing data to disk
  • Building a better disk

a) Scheduling the access to disk

The OS is responsible for the efficient using of the hardware: for the hard-disk this resumes to having a fast access time and a big bandwidth.

The bandwidth represents the number of bits transferred divided by the time between the moment when the request was sent till the moment when the request was resolved.

For a better and efficient way of using the hard-disk some engineers thought about implementing the following algorithms regarding the way of serving the requests:

  • FCFS (First Come, First Served)
  • SSTF (Shortest Seek Time First)
  • SCAN
  • C-SCAN
  • LOOK
  • C-LOOK

I. FCFS

– we can observe the requests are resolved sequentially basing on the order of request income.

– this brings a total read/write head movement of 640 cylinders

II. SSTF

– we can see the algorithm chose the request with the shortest distance to the current position

– this algorithm brings a short access time but neglects the priority requests

III. SCAN

The scan algorithm permits the read/write head to  scan the whole disk from one edge to the other resolving the requests as it moves..

IV. C – SCAN

It’s working the same way as the SCAN algorithm does, except that when it reaches one of the edges, it turns back immediately without scanning through it’s way back.

V. LOOK and C – LOOK

The look and the C-look are an optimization of the Scan and C-Scan

3. Managing the disk

The disk is divided in small pieces called sectors. This operation is called low-level formatting and is made in the factory before selling the disk. The last 30 years, each sector was build to “hold” 512 bytes, but recently it can “hold” 4 kb.

MBR ( Master Boot Recorded) partitioning:

( ! ) This is the standard partitioning schema for the PC (bios)

A disk partitioned with the MBR schema will look like this:

  • the first track will be reserved (63 sectors of 512 bytes)
  • maximum 4 primary partitions and one extended
  • the first sector of the 63 sectors is called MBR sector

The MBR sector looks like this:

  • first 446 bytes  hold the bootstrap loader program 
  • the next 64 hold the partition table
  • the last 2 bytes hold the signature (55AA)

For a better relocation of the stored blocks, the OS uses a FFS (Fast File System): the related blocks are grouped so later on the seek time can be shortened.

3. Managing the Swap Space

The swap space is an extension of the main memory.

  • Under UNIX the swap space is stored in a different partition, or disk.
  • In Windows the swap space is stored in files

4. Building a better disk

Better, in terms of disk optimization, means more density (more bytes on square centimeter: nowadays there can be more than 30 billion bits per square centimeter stored).

The solution: RAID (Redundant Array of Independent Disks):

  • has multiple disks
  • uses the data striping ( storing data of the same process on different disks)

Personal consideration – I believe the flash memory will replace soon the disk based memory, meaning that it’s useless to invest in a RAID technology

IQ tests scam

I was insecure about this test since I heard about them. I can’t hold my self not to write about how people get scammed with these kind of tests. They clearly become racists splitting the humans in idiots/smart/genius/supreme genius. How can people even accept somebody telling them, they are under or above a certain % of population. 

Do you feel confident when you realized so many things, created so many programs, worked for so many hours, in a clever way, proving at different contests that you are among the best, but somebody comes and tell you that you’re no genius.

Don’t people realize how MENSA is curtailing their dreams, their effort their belief of being smart and capable to create marvelous things…

I believe, instead of having tests with triangles, instead of loosing time thinking about numbers defining the immense capacity of the brain, which by the way cannot be resumed to a number, go learn some math, go learn some medicine, go programming, create something, read, write, be INTELLiGENT not MENSA qualified.